CDR - Process
- Former user (Deleted)
- SVK Support
- Shawn Gordon
To Process or Re-Process a CDR file, please follow the steps below:
- Click the [Call Detail Records] menu button to open the CDR Upload / Activity window

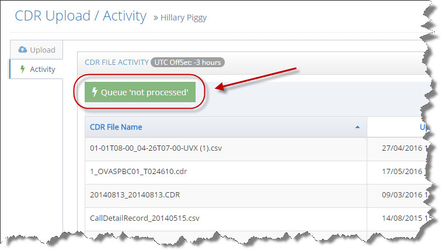
- Click on the
 TAB to show the CDR Activity module.
click image to enlarge - Click the
 next to the CDR file you would to process /re-process.
This will add the CDR file to the processing queue so that the processing engine can process the file.
click image to enlarge - The CDR files status will change to [queued] and then [processing] once the processing engine starts processing the file:


click image to enlarge
Once the processing is completed the status of the CDR file will be updated with either a [processed] or [processing error] status:

click image to enlargePOST PROCESSING REPORTS
It is very important that you review the Post Processing Reports after you process a CDR file. Post Processing Reports will help you to identify whether or not any CDR records were skipped because they were either not identified to customer or because they do not match any Rate Table entries.
Below are the different type of Post Processing Reports:
 Peek - The Peek button located in the Peek | Report column allows you to view (peek at) the first 200 records imported from your CDR file . The Peek feature can be very useful when trying to get an idea of how the data from the CDR file has been imported into the CDR2Cloud database.
 Status Report - The Status Report button located in the Peek | Report column allows you to view statistical data on the processing of the file.
 Orphan Report - The Orphan Report button located in the Peek | Report column allows you to view all the CDR records that were not associated to a customer record and will not be billed.
  Rejects Report - The Rejects Report button located in the Peek | Report column allows you to view all the CDR records that were associated to a customer but not rated. Rejected CDR records are commonly caused by missing Rate Table Patterns or Rate ID.
  Log Report - The Log Report button located in the Peek | Report column allows you to view all the logs of the files processing. This log will detail any error messages should an error occur during the processing of the file.
 INFO
 Processing a CDR file does not automatically generate Invoices nor update customer account balances. After processing CDR files for a particular month you must then generate Invoices in bulk using the CDR Invoice feature. For more information on generating Invoices in Bulk please see the Invoice - CDR topic.
TIme Zone Adjustments
CDR2Cloud allows you to display the [Uploaded] and [Processed] time of a CDR file in your own local (Time Zone) time. This feature can be very helpful as it allows you to relate to CDR Processing in real-time versus having to do a Time Zone calculation each time you review the CDR History.
EXAMPLE
A CDR File that is processed at 11:50 AM UTC (Coordinated Universal Time) would show up as 1:50 PM to user located in Zurich - Switzerland (CEST – Central European Summer Time) but as 7:50 AM to user located in Toronto - Canada (EDT – Eastern Daylight Time).
The CDR2Cloud user located in Toronto would prefer to the see the CDR Processing time represented as Toronto local time and like wise, the user in Zurich will prefer to see the the time represented Zurich local time.
To adjust the CDR2Cloud displayed time to that of your own time zone you may change the setting of the [Display Time UTC OffSet (Time Zone)] located in the [Account Setting] > [General] module. For more information on the [Display Time UTC OffSet (Time Zone)] setting please see the Tenant - Settings topic.
The CDR2Cloud Activity module will always display your current Time Zone OffSet setting as shown below:

Queuing Multiple Files Simultaneously
CDR2Cloud allows you to queue all files that have the 'Not Processed' and 'Already Processed' by using clicking the [Queue 'not processed'] button.